


I just wrote about Geth and how to use it. After reading this, you’ll be able to interact with nodes and the blockchain itself using JSON-RPC. You’ll also learn how to create your own blockchain, create a new account, and mine a block.
Hey everyone! In this article, I’m going to walk you through how blockchain nodes communicate. This is for those of you who already have a solid understanding of how blockchains work. If you’ve read my articles on Solidity, Ethereum, and the fundamentals of blockchain (or even the more advanced stuff), you’re in the right place!

This isn’t going to get overly technical, so don’t worry if you’re not a hardcore developer. Plus, I’ve linked all the files you’ll need down below so you can download and install them on your Linux distro. If you’re not using Linux, no problem you can always set up a virtual machine or Docker.
Alright! First, we’ll talk about Go Ethereum (or geth, for short). Geth is a command-line tool and the official Go implementation of Ethereum. It’s widely used and serves as the standard for most Ethereum-based projects. We’re going to use it a lot in this guide, so get ready to familiarize yourself with it.
Let’s get started with installing geth! First, we need to update the package lists on your Linux system. This step ensures you have the latest tools available, which is important for this and any future exercises.
Run this command to update your package list:
sudo apt-get update
Next, we’ll install cURL, a handy tool we’ll need for downloading files. Most Linux distros come with cURL pre-installed, but if yours doesn’t, just run:
sudo apt-get install curl
If it asks you to confirm using additional disk space, just type “yes” and hit enter.
Now, let’s download Geth and the additional tools. Use this curl command to grab the Geth package and save it as geth.tar.gz:
sudo curl -o geth.tar.gz https://gethstore.blob.core.windows.net/builds/geth-alltools-linux-amd64-1.8.21-9dc5d1a9.tar.gz
Once it’s downloaded, we’ll unpack the archive using the tar command. This will extract the files and organize them nicely for us:
sudo tar -C geth --strip-components 1 -xzf geth.tar.gz
Now, let’s move the Geth tools to your system’s usr/bin folder so you can run them from anywhere:
sudo cp geth/* /usr/bin/
Finally, let’s clean up. You can delete the downloaded files to free up space, or keep them around if you’d prefer. If you want to clean up, just run:
sudo rm -r geth geth.tar.gz
And that’s it! Geth & others are now installed on your system. Before we start using it, let me give you a quick overview of how it works and what you can do with it.
Alright, now that you’ve downloaded and installed Geth, let’s talk about what happens when you run it in your terminal. Two main things happen right away: (1) Geth connects to other blockchain nodes from around the world. Most Ethereum nodes run on this client, and the Ethereum network itself relies heavily on it. (2) Geth opens a JSON-RPC server on your computer. This lets you interact with your local node programmatically.
For the first part, Geth starts connecting to other nodes and begins downloading blocks. Essentially, it’s replicating the blockchain locally on your computer, storing the entire chain. Think of it like torrenting, but for blockchain data.
Geth offers three main ways to sync with the blockchain:
- Full Sync (slow)
- Fast Sync (default)
- Light Sync (experimental)
1. Full Sync
If you run Geth as a full client in full sync mode, it downloads all the block headers and bodies for every block. It also reprocesses every single transaction ever made on the blockchain. This mode is thorough but incredibly resource-intensive. You’ll need tons of disk space (we’re talking dozens of GBs) and a lot of bandwidth to keep downloading data from other nodes.
2. Fast Sync
This is the default option. Like full sync, it downloads all the block headers and bodies, but it only processes the last 1,024 transactions. This reduces the redundancy while still ensuring the blockchain is secure and consistent. It’s faster and less storage-heavy than full sync.
3. Light Sync
Light sync is the new thing actually. It only downloads the block headers and grabs a snapshot of the current state of the blockchain. This makes it much faster and uses far less space around 100 MB. You can be synced up in just a minute or so!
Here’s the cool part: Geth comes with a built-in JavaScript JSON-RPC interface. Think of it as a command line where you can type JavaScript commands to interact with your node and the blockchain itself.
You can do things like:
- Create new accounts
- Send transactions
- Query blockchain data
- Tons of other cool stuff
There are two main ways to interact with the JSON-RPC: (1) Inter-Process Communication (IPC) This involves communicating directly with Geth via a file or a pipe. It’s great if you’re running multiple Geth instances on the same machine. (2) HTTP RPC Geth can also open an HTTP RPC endpoint, which makes it accessible over HTTP. This is where tools like Web3.js come in, they allow your browser or web apps to interact with Geth using the HTTP RPC.
If you’re on Mac, Windows, or Linux, just type geth in your terminal and hit enter. That’s it! Geth will fire up, and the first time you run it, you’ll see a ton of log output flooding your terminal. Don’t panic.. it’s not useless info, but we’ll talk more about it in the next section. For now, we just want to see what happens when you start it up for the first time.

The first thing Geth does is connect to the Ethereum mainnet and begin block synchronization. This process downloads the blockchain’s data from the network onto your hard drive. It doesn’t just grab block headers; it pulls the entire block content, which is why it can use a lot of bandwidth and take up a ton of disk space.
Synchronization Modes
Geth uses three different synchronization modes, depending on how much data you want and how much time and resources you’re willing to spend:
- Fast Mode (default)
When you run Geth for the first time, it defaults to fast sync. This mode downloads all the blocks but skips processing transactions except for the last 1,024. It’s faster than the other modes because it focuses on grabbing the data instead of verifying every transaction. - Full Sync
Full sync is the most thorough option. It downloads all the blocks, headers, and content, and it processes every single transaction in the blockchain to ensure security and accuracy. It’s way slower and uses a lot more CPU, bandwidth, and storage, but it ensures the blockchain data on your machine is 100% verified. - Light Mode
This is the lightweight option. It skips downloading all the blocks and only grabs the headers and a snapshot of the current blockchain state. It’s much faster, uses minimal bandwidth, and takes up way less space (around 100 MB). Perfect if you just want to quickly sync and don’t need all the details.
Restarting Geth
If you stop Geth and restart it, it won’t use fast sync again. Instead, it’ll start a full sync by default. Why? Because it needs to re-verify the blocks it downloaded earlier while continuing to sync the rest. This takes a lot more time, CPU, and bandwidth compared to fast sync.
If you want to use fast sync again, you’ll need to delete the previously downloaded blockchain data. To do this:
- Stop Geth.
- Navigate to your blockchain directory (e.g.,
Desktop/blockchain/geth-prac/geth). - Inside the
gethdirectory, you’ll find a folder calledchaindata. This is where all the downloaded blocks are stored as separate files. - Delete the
gethdirectory (or just thechaindatafolder if you prefer).
Once you’ve done that, you can restart Geth, and it’ll begin syncing in fast mode again.

1. Peer Count
Maximum peer count.... ETH=25 LES=0 total=25
This shows how many peers (other nodes) Geth will try to connect with.
- ETH=25: The maximum number of full Ethereum nodes you can connect to.
- LES=0: No “light” nodes allowed (light nodes don’t store the full blockchain).
- total=25: Total is just ETH + LES (in this case, 25).
The more peers Geth connects with, the faster it can sync the blockchain.
2. Starting the Node
Starting peer-to-peer node .... instance=Geth/v1.8.21-stable-9dc5d1a9/linux-amd64/go1.11.4
This tells you about the Geth instance you’re running.
- Version:
v1.8.21-stableis your Geth version. - Platform:
linux-amd64means it’s the 64-bit version running on Linux. If you were running the 32-bit version, you’d face memory issues. For example, while mining or importing blocks, the 32-bit version might crash because it can’t handle big memory loads. Always stick to 64-bit if you can. - Go Version:
go1.11.4shows it’s compiled with Go version 1.11.4.
💡 Heads-up: Geth doesn’t auto-update, so when a new version comes out, you’ll need to update it manually.
3. Cache and Chain Data
Allocated cache and file handles...... database=/home/sammy/.ethereum/geth/chaindata cache=512 handles=536870908
This tells you where Geth is storing the blockchain.
database=/home/sammy/.ethereum/geth/chaindata: This is the folder where your blockchain data is saved. If you ever need to clear it (e.g., for a fresh sync), you’d delete this folder.cache=512: Geth is using 512 MB of cache memory for faster data access.handles=536870908: This refers to the maximum number of file handles that can be opened. It’s a Linux system thing and generally not something you need to tweak.
4. Chain Initialization
Initialised chain configuration config={ChainID: 1 Homestead: 1150000 ...}
- ChainID: 1: This tells you that you’re connected to the Ethereum mainnet (the real network). If it said something like
1337, you’d be on a private or test network. - Homestead, Byzantium, Constantinople: These are Ethereum’s major upgrades (called hard forks). The log shows the block numbers where each upgrade was activated.
5. P2P Networking
Started P2P networking .... self=enode://fafa...@127.0.0.1:30303
This is your node’s identity on the Ethereum network. Other nodes use this enode address to connect to you. It includes your IP (127.0.0.1), UDP port (30303), and TCP port (30303).
6. IPC Endpoint
IPC endpoint opened .... url=/home/sammy/.ethereum/geth.ipc
This means Geth has opened an IPC (Inter-Process Communication) endpoint. You can use tools like geth attach or libraries like Web3.js to interact with this endpoint and send commands to your node.
When Geth is running, it creates an IPC file (a way for processes to communicate).
If you start Geth the usual way without adding any extra parameters it’ll show you the IPC endpoint in the logs. For example:
url=/home/sammy/.ethereum/geth.ipc
On Windows, this endpoint is actually a named pipe, and you don’t have to worry about where it’s located. You can connect to the Geth instance from anywhere in the OS without needing to think about the file.
But on Linux or Mac, the IPC file location actually matters. You’ll need to know where it is because the tools you use to connect to Geth (like geth attach or Web3.js) will require the full path to the file.

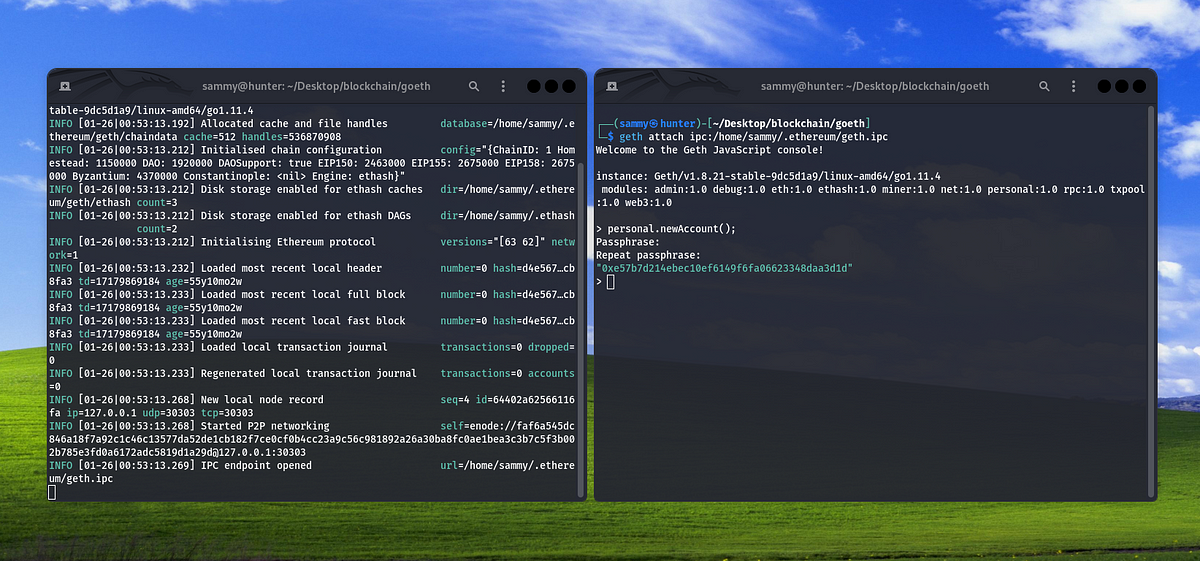
If you’re on Linux and want to connect to your running Geth instance from another terminal, you can use the geth attach command. This basically puts Geth into “client mode.”
The Geth process that’s already running is like a server, accepting connections from other processes or terminals. By typing geth attach, you’re attaching to that running instance. When you do this, it’ll greet you with something like “Welcome to the Geth console.”
The console shows details like:
- The instance you’re connected to (e.g., version info)
- The data directory where everything is stored
- Available modules (like admin, web3, personal, etc.)
Now, if you’re on Linux or Mac (like me), you’ll need the IPC endpoint to attach. Look at the log for the path (e.g., /home/sammy/.ethereum/geth.ipc) and run this command:
geth attach ipc:/home/sammy/.ethereum/geth.ipc
That’s it! You’re now connected to the same Geth instance and can interact with it. Pretty simple!!
Alright, so we’ve got the server running, the client connected, and everything’s set up. Now let’s interact with it. There are a bunch of modules available, like admin, debug, eth, ethash, miner, net, and a ton of others.
What I’m gonna show you is how to create a new account using the Geth console. It’s super simple. You just type: personal.newAccount();

This is a JavaScript command, it’s literally calling a function. When you do this, it’ll ask you to type in a passphrase. If you’ve used Linux, you’re probably familiar with this kind of thing.
Once you enter the passphrase, Geth will create a new account for you. But here’s the question one would ask: Where are these accounts stored?
Well, Geth saves them in a file-based database located in your home directory under a hidden folder called .ethereum. Since the folder name starts with a dot, it won’t show up in a normal ls command. You’ll need to type: ls -la to see hidden files.
If you notice, the Ethereum address shown in both terminals is the same. The only difference is that one is in lowercase and the other in uppercase. That’s just how Geth handles things, it doesn’t really matter since Ethereum addresses aren’t case-sensitive.
So, when you’re interacting with the Geth console, that’s essentially what’s happening behind the scenes.
Now, if you head over to the Ethereum GitHub repository, there’s a section for developer/management APIs. You’ll find a full list of management APIs there. There’s also another endpoint called JSON RPC. This is the one that handles all the interactions with the blockchain.
JSON RPC is the endpoint used by browsers, web3 libraries, and basically any tool that interacts with the Ethereum blockchain. And in the case of Ethereum, this typically happens through the eth module.
In general, you can do everything blockchain-related directly from the command line. But at some point, you’ll want a cleaner, user-friendly way to interact with the blockchain. That’s where dApps (decentralized apps) come into play.
With tools like web3.js (a JavaScript library), you can connect your dApp to the blockchain. This removes the need for command-line interactions altogether. Instead, you’ll have a cool UI that users can interact with while web3.js handles all the blockchain stuff in the background.
Before we start setting up a Genesis block, we need to talk about the three different types of blockchains.
All blockchain systems are similar in their inner workings and required functionality but differ in the way new network participants (nodes) join a network:
- Public (permissionless)
- Private (permissioned)
- Consortium-controlled (permissioned)
Public Blockchains
As their name indicates, public blockchains are public, so anyone can join them from anywhere. This contrasts with permissioned systems, where access to all the network access points is individually controlled. Furthermore, new participants are unvetted, and there are no measures anyone can take to exclude a node from the network at any time. No one is responsible, and anyone can participate in reading, writing, and verifying the blockchain. Another property of this type of blockchain is that it is open and transparent. Each node in the network can review any entry from any time. The most prominent examples of public blockchains today are the Bitcoin and Ethereum networks.
Private Blockchains
Private blockchains require explicit pre-verification of all network nodes. Given that there is a central point of control, there is a common notion that private blockchains are inferior to public (permissionless) blockchains because they have a single point of failure. Since all participating parties that run nodes in these blockchains are usually known to each other, trust is not a central concern, limiting the use cases for private blockchains. Enterprises that are particularly concerned with data privacy and control, rather than technical design, tend to use private blockchains, the most prominent of which are Ripple and Hyperledger.
Consortium-Controlled Blockchains
Consortium-controlled blockchains are an extension of the private blockchain setup, as they remove the centralized autonomy that is prevalent in the case of private blockchains. For example, a consortium could consist of thirty financial institutions or any number which specify that decisions made in the network are accepted as valid only if more than half of the participating institutions confirm it. In that sense, more than one person or company is responsible for the network. The most prominent example of a consortium-operated blockchain today is Corda by R3.
Next you will configure and launch a private Ethereum network using the puppeth command. This step will include creating the first block of our own blockchain (hence, the name “genesis”). The genesis block forms the foundation of any blockchain system and is the prototype of all other blocks in the blockchain. The puppeth command is used to assemble and maintain private networks: puppeth

Next, you will be prompted to specify an Ethereum network name, type node_pow
Please specify a network name to administer (no spaces or hyphens, please)
> node_pow
Next, you will be prompted to select an action; choose 2 to configure a new genesis.
What would you like to do? (default = stats)
1. Show network stats
2. Configure new genesis
3. Track new remote server
4. Deploy network components
> 2
Next, you will be prompted to specify what you want to do; choose 1 to create a new genesis block from scratch.
What would you like to do? (default = create)
1. Create new genesis block from scratch
2. Import already existing genesis
> 1
Next, you will be prompted to select a consensus algorithm; choose 1 to use proof-of-work (PoW):
Which consensus engine to use? (default = clique)
1. Ethash — proof-of-work
2. Clique — proof-of-authority
> 1
Next, you will be prompted to specify pre-funded accounts. Copy and paste the first address that you set up in step (d) so it gets pre-funded.
Which accounts should be pre-funded? (advisable at least one)
> 0xe9c51fb5f23321142ee20e991413b956e1c5fbc6
> 0x
You will now be asked if you want to pre-fund your initial address with 1 wei; type yes and press enter to pre-fund the address.
Should the precompile-addresses (0x1 .. 0xff) be pre-funded with 1 wei? (advisable yes)
> yes
Next, you will be prompted to specify a network identifier; type 101 and press enter:
Specify your chain/network ID if you want an explicit one (default = random)
> 101
Next, you will be prompted to select an action; choose 2 to manage the existing genesis.
What would you like to do? (default = stats)
1. Show network stats
2. Manage existing genesis
3. Track new remote server
4. Deploy network components
> 2
Next, you will be prompted to select an action; choose 2 to export the genesis.
1. Modify existing fork rules
2. Export genesis configuration
3. Remove genesis configuration
> 2
You will now be prompted to select a folder in which to save the genesis specs; press enter to select the default (current) folder.
Which folder to save the genesis specs into? (default = current)
Will create node_pow.json, node_pow-aleth.json, node_pow-harmony.json, node_pow, parity.json
Next, you will be prompted to select an action, press the key combination Control + C to exit Geth; after that, you should again see the root@… command prompt.
What would you like to do? (default = stats)
1. Show network stats
2. Manage existing genesis
3. Track new remote server
4. Deploy network components
> ^C

In this section, we’ll go over how to create your own private Ethereum network and the genesis JSON file. First, use geth to start a new network with your configured genesis file by running: geth init node_pow.json --datadir node_pow
Next, start mining the first block on your private blockchain with this command: geth --datadir node_pow --mine --miner.threads 1

When you start the network for the first time, it will need to create a DAG file. (We won’t dive into the technical details of DAG files here.) The DAG file serves two main purposes: (1) To make mining ASIC-resistant (so people can’t use special mining hardware). (2) To make it easier for clients to verify mined blocks without too much computational load.
Depending on your hardware, generating the DAG file might take up to 30 minutes. While it’s being created, you should see something like this on your output screen:
Once the DAG file is created, your client node will start mining automatically. You’ll see regular output for each block being mined. Congrats you’re mining your own blockchain!
After mining a few blocks, you can exit the Geth console by pressing Ctrl + C.
Now, you’ll want to get back into the Geth console in interactive mode so you can start typing commands to interact with your blockchain. To do that, use the following command: geth --verbosity 2 console --datadir node_pow --mine --miner.threads 1 --nousb
Finally, let’s stop the miner before moving on to the next exercises. You can stop the miner anytime by running this command: miner.stop();
If you want to check if your blockchain is being mined, you can use this command at any point: eth.mining

Now we will move to funds between the accounts, and demonstrate different scenarios and their impact (e.g., sending funds with and without a transaction fee). Throughout the exercises, we will periodically analyze the chart of accounts on our blockchain (i.e., review how much money is associated with each address). Following the money in this fashion will allow the reader to obtain a hands-on understanding of how funds move within the blockchain realm. Finally, we will look at one of the blocks containing one of the exercise transactions to provide a concrete example of exactly what data is captured as part of the transaction.
If you completed the above exercises. you can continue from here. Otherwise, please complete (or redo) all the steps from above. For all the steps in this section, we assume that we are set up and ready to go with a PoW-based setup.
As a first step, we will re-launch the geth console. The command below launches the Geth console in an interactive mode and with limited verbosity, meaning we will not see all of the mining output.
geth --verbosity 2 console --datadir node_pow --mine --miner.threads 1 --nousb
Accounts and balances
At any point, you can look at what accounts are on your blockchain; this is helpful for this exercise because you can track them individually. Once a transaction involving one or more of your accounts occurs, these changes will be captured on the actual blockchain as well. To see what accounts exist already, you can use the personal.listAccounts command from within the Geth terminal:

As above, you should be seeing two accounts. These are the two accounts that you created and pre-funded as part of the above exercises. As a next step, let us validate the value contained in each of these two accounts. For this, you will use the web3.eth.getBalance command.
Next, using the getBalance command, you can check the account balance of your individual accounts; it will be displayed in wei, the smallest unit in the Ether realm. For simplicity, you can write the same prompt by referencing one of your accounts via a parameter and the personal.listAccounts function; this will yield the same result:

Your first transaction
Before we create our first transaction, we will create an additional account. This account will not be pre-funded, making it easier for us to validate whether a transaction took place. From the Geth console, use the following command to create a new account: personal.newAccount()
At any point, you can look again at what accounts exist; there should now be three accounts: the two accounts that you created above and the new (empty) account that you just created: personal.listAccounts
Next, using the getBalance command, you can verify that the latest account does not contain any ether: web3.eth.getBalance(“0x…”). For simplicity, you can write the same prompt by referencing one of your accounts via a parameter and the personal.listAccounts function; this will yield the same result:

Note also that you can use the “from wei” function to convert this number into Ether: web3.fromWei(web3.eth.getBalance(personal.listAccounts[0])),”Ether”)
Next, we will execute our first transaction. For this, we need both a sender and a receiver address, as well as the private key of the sender. In the Geth command line, creating a new transaction works as follows:
web3.eth.sendTransaction(
{
from:personal.listAccounts[0],
to:personal.listAccounts[2],
value:1000
}
);

After trying this command, you will notice an error because you need to unlock the sender account first. To do this, use the following prompt (and the password you set when you created this address). Now you should be able to conduct the transaction using web3.eth.sendTransaction:

The number displayed is the transaction hash; it can be used to identify any transaction conducted on the blockchain.


Transaction validation
Next, let us re-validate the balance of both accounts to confirm that the transaction was carried out: web3.eth.getBalance(personal.listAccounts[2]);
Hold on. What happened here? The balance in your sender accounts is still what it was before! This is because you were not mining the blockchain. For the transaction to actually occur, you need first to start the mining process. At any point in time, you can use the following command to determine if your blockchain is actually being mined: eth.mining
Before we move to launch the mining process so we can finally send our transaction, let us look at the open transaction pool. Remember, these are the open transactions that have not yet been mined and so are not yet part of the blockchain. Next, we will start the mining process using the following command (if not started): miner.start(); and You can stop the miner again with the following command: miner.stop();
At this point, we assume that our transaction was (1) mined, (2) included in a block, and (3) removed from the open transaction pool. Let’s continue to validate these assumptions next. As you can see from the output, the open transaction pool is now empty; there are no pending transactions awaiting validation.

Success! We can now see that the specified amount of 1,000 wei was transferred from our first personal account and sent to the third personal account we created.
Now that everything is set up! your network is initialized, you’ve created an account, you know how to start mining, and you see ethers rolling into your account! noice. now, I want to show you a few tips.
As you can see, having two windows open, starting Geth, switching to another window, attaching to it, starting the miner, and so on can be a bit inconvenient. What I usually do is close one window. I don’t want to attach anything, so I just open a new window and start Geth directly. This way, it unlocks my account, and I can work with my blockchain from the start, using the account I want.
To do this, I run Geth with the following commands:
--datadir--nodediscover--unlock(to unlock my first account)--mine(to start mining)
Once I do this, I’ll see the usual log output from Geth, and somewhere in the middle, it will ask for my passphrase. It will stop there until I type it in, and then it will continue.
Thanks for reading! Next, we’ll dive into more advanced topics, like participating in the actual Ethereum and Bitcoin networks as a miner/validator/node, creating a dApp, and much more.


